How to Use TablePress
Posted on Mar 3, 2015 in PluginsAdd New Table
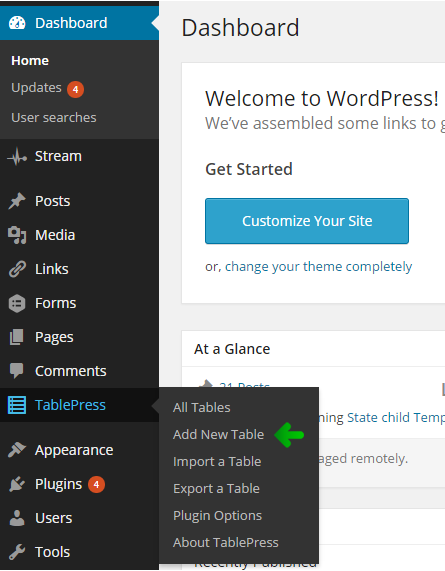
Navigate to Tablepress > Add New Table
Screenshot showing where to access the Tablepress
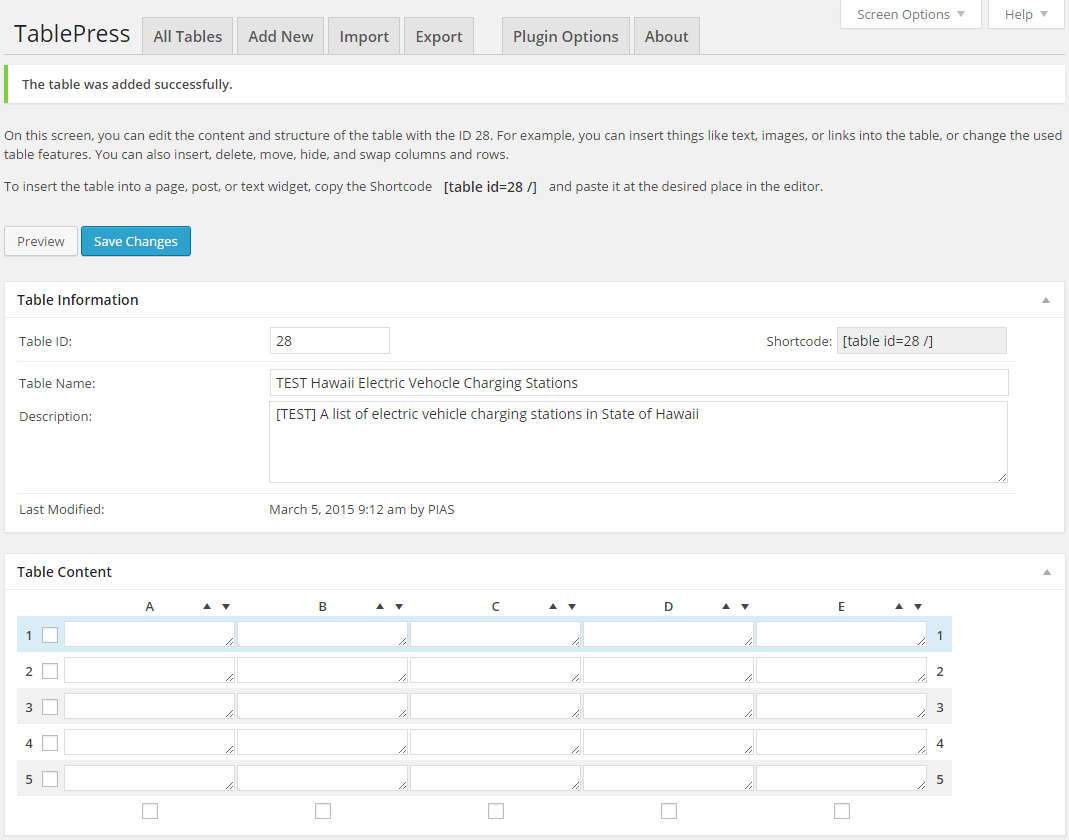
Enter Table Name, Table Description, Number of Rows and Columns > Add Table
Screenshot showing fields to enter to add a new table.
And a new blank table is created.
Screenshot shows a blank table created

Import a Table
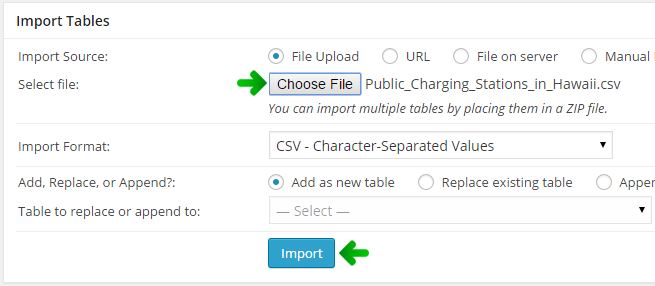
Navigate to Tablepress > Import a Table
Screenshot showing where to access the Tablepress and import a new table
Select table file and upload to WordPress. Support format including CSV, XLS and XLSX.
Screenshot shows where to upload table files and options to do with uploaded file

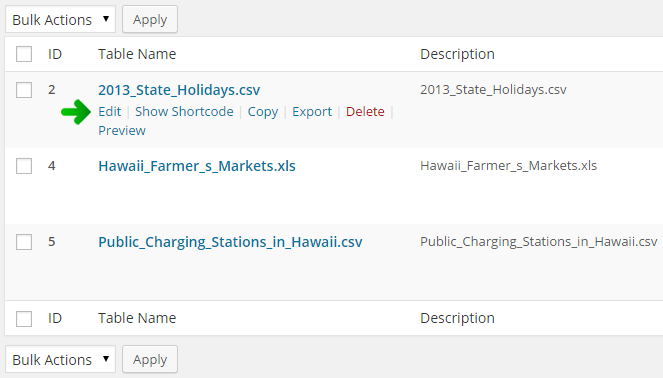
Edit Table
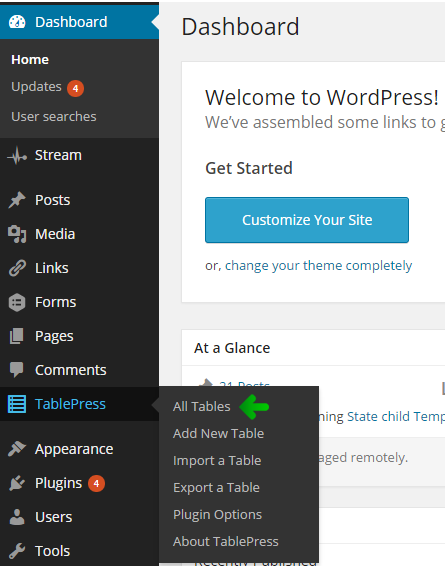
Navigate to Tablepress > All Tables
Screenshot shows where to access and edit a table.
Hover mouse to the table file intended to edit > Edit
Screenshot shows how to access and edit a table
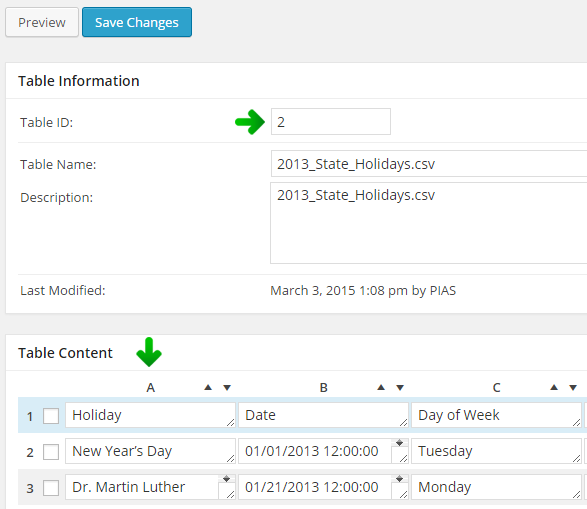
To insert a table into a page, post, or text widget, copy its Shortcode
Screenshot shows the structure of shortcode
and paste it at the desired place in the editor. Each table has a unique ID that needs to be adjusted in that Shortcode.
Screenshot shows Table ID and content of table.
Insert Table Into a Page
To insert the table into a page, post, or text widget, copy the Shortcode
Screenshot shows the structure of shortcode
and paste it at the desired place in the editor.
Additionally, there is a Insert a Table from Tablepress tool in the editor to help you generate and insert the Shortcode into the page.
Use Custom Commands
Order Table – “order” command
Scroll down to the end of Edit Table
Screenshot shows table options.
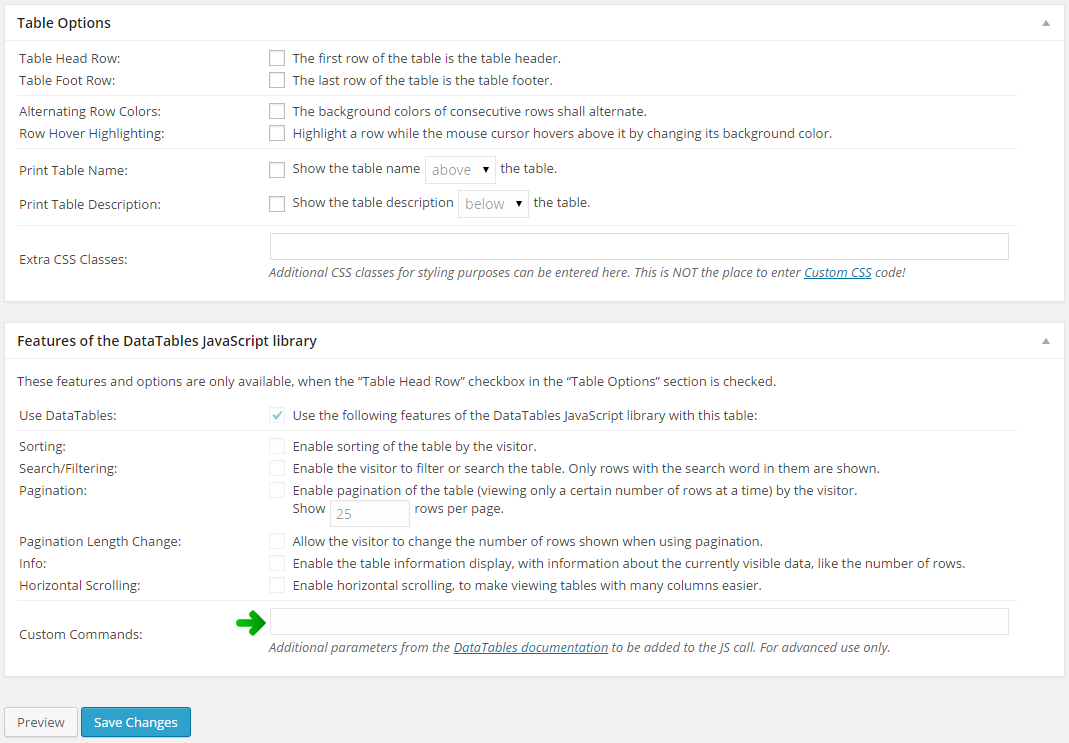
Set Parameter
“order”: [[0, ‘asc’]]
Using this parameter you can define which column(s) the order is performed upon, and the ordering direction.
The order must be an array of arrays, each inner array comprised of two elements:
- Column index to order upon (‘0’ represents 1st. Column, ‘1’ represents 2nd. Column, and so on)
- Direction so order to apply (
ascordesc)
Example 1:
Table of Hawaii Agriculture Food Products – Order by 1st. column (Item)
Custom Command parameter:
Screenshot shows parameter set for Example 1
| Item | Island | Price |
|---|---|---|
| Apple | Hawaii | 10 |
| Banana | Hawaii | 12 |
| Banana | Maui | 15 |
| Apple Banana | Kauai | 20 |
| Apple Banana | Hawaii | 17 |
| Eggs | Oahu | 10 |
| Eggs | Hawaii | 15 |
| Avocado | Hawaii | 20 |
| Coffee | Oahu | 25 |
| Pineapple | Oahu | 17 |
| Strawberry | Maui | 14 |
| Coffee | Hawaii | 23 |
| Coffee | Maui | 24 |
| Papaya | Hawaii | 21 |
| Papaya | Maui | 17 |
| Avocado | Kauai | 13 |
| Apple | Kauai | 12 |
| Pineapple | Maui | 19 |
| Mountain Apple | Hawaii | 23 |
| Sour Sop | Hawaii | 27 |
Example 2:
Table of Hawaii Agriculture Food Products – Order by 2nd. column (Island) then 1st. column (Item)
Custom Command parameter:
Screenshot shows parameter set for Example 2
| Item | Island | Price |
|---|---|---|
| Apple | Hawaii | 10 |
| Banana | Hawaii | 12 |
| Banana | Maui | 15 |
| Apple Banana | Kauai | 20 |
| Apple Banana | Hawaii | 17 |
| Eggs | Oahu | 10 |
| Eggs | Hawaii | 15 |
| Avocado | Hawaii | 20 |
| Coffee | Oahu | 25 |
| Pineapple | Oahu | 17 |
| Strawberry | Maui | 14 |
| Coffee | Hawaii | 23 |
| Coffee | Maui | 24 |
| Papaya | Hawaii | 21 |
| Papaya | Maui | 17 |
| Avocado | Kauai | 13 |
| Apple | Kauai | 12 |
| Pineapple | Maui | 19 |
| Mountain Apple | Hawaii | 23 |
| Sour Sop | Hawaii | 27 |
Pagination – “pagingType” command
Scroll down to the end of Edit Table
Screenshot shows table options.
Set parameter
“pagingType”: “simple_numbers” [Default]
DataTables has four built-in paging button arrangements:
- simple – ‘Previous’ and ‘Next’ buttons only
- simple_numbers – ‘Previous’ and ‘Next’ buttons, plus page numbers
- full – ‘First’, ‘Previous’, ‘Next’ and ‘Last’ buttons
- full_numbers – ‘First’, ‘Previous’, ‘Next’ and ‘Last’ buttons, plus page numbers
Example 1:
Table of Hawaii Agriculture Food Products
“pagingType”: “simple”
Screenshot shows pagingType set as simple
| Item | Island | Price |
|---|---|---|
| Apple | Hawaii | 10 |
| Banana | Hawaii | 12 |
| Banana | Maui | 15 |
| Apple Banana | Kauai | 20 |
| Apple Banana | Hawaii | 17 |
| Egg | Oahu | 10 |
| Egg | Hawaii | 15 |
| Avocado | Hawaii | 20 |
| Coffee | Oahu | 25 |
| Pineapple | Oahu | 17 |
| Strawberry | Maui | 14 |
| Coffee | Hawaii | 23 |
| Coffee | Maui | 24 |
| Papaya | Hawaii | 21 |
| Papaya | Maui | 17 |
| Avocado | Kauai | 13 |
| Apple | Kauai | 12 |
| Pineapple | Maui | 19 |
| Mountain Apple | Hawaii | 23 |
| Sour Sop | Hawaii | 27 |
Example 2:
Table of Hawaii Agriculture Food Products
“pagingType”: “simple_numbers”
Screenshot shows pagingType set as simple_numbers
| Item | Island | Price |
|---|---|---|
| Apple | Hawaii | 10 |
| Banana | Hawaii | 12 |
| Banana | Maui | 15 |
| Apple Banana | Kauai | 20 |
| Apple Banana | Hawaii | 17 |
| Eggs | Oahu | 10 |
| Eggs | Hawaii | 15 |
| Avocado | Hawaii | 20 |
| Coffee | Oahu | 25 |
| Pineapple | Oahu | 17 |
| Strawberry | Maui | 14 |
| Coffee | Hawaii | 23 |
| Coffee | Maui | 24 |
| Papaya | Hawaii | 21 |
| Papaya | Maui | 17 |
| Avocado | Kauai | 13 |
| Apple | Kauai | 12 |
| Pineapple | Maui | 19 |
| Mountain Apple | Hawaii | 23 |
| Sour Sop | Hawaii | 27 |
Example 3:
Table of Hawaii Agriculture Food Products
“pagingType”: “full”
Screenshot shows pagingType set as full
| Item | Island | Price |
|---|---|---|
| Apple | Hawaii | 10 |
| Banana | Hawaii | 12 |
| Banana | Maui | 15 |
| Apple Banana | Kauai | 20 |
| Apple Banana | Hawaii | 17 |
| Eggs | Oahu | 10 |
| Eggs | Hawaii | 15 |
| Avocado | Hawaii | 20 |
| Coffee | Oahu | 25 |
| Pineapple | Oahu | 17 |
| Strawberry | Maui | 14 |
| Coffee | Hawaii | 23 |
| Coffee | Maui | 24 |
| Papaya | Hawaii | 21 |
| Papaya | Maui | 17 |
| Avocado | Kauai | 13 |
| Apple | Kauai | 12 |
| Pineapple | Maui | 19 |
| Mountain Apple | Hawaii | 23 |
| Sour Sop | Hawaii | 27 |
Example 4:
Table of Hawaii Agriculture Food Products
“pagingType”: “full_numbers”
Screenshot shows pagingType set as full_numbers
| Item | Island | Price |
|---|---|---|
| Apple | Hawaii | 10 |
| Banana | Hawaii | 12 |
| Banana | Maui | 15 |
| Apple Banana | Kauai | 20 |
| Apple Banana | Hawaii | 17 |
| Eggs | Oahu | 10 |
| Eggs | Hawaii | 15 |
| Avocado | Hawaii | 20 |
| Coffee | Oahu | 25 |
| Pineapple | Oahu | 17 |
| Strawberry | Maui | 14 |
| Coffee | Hawaii | 23 |
| Coffee | Maui | 24 |
| Papaya | Hawaii | 21 |
| Papaya | Maui | 17 |
| Avocado | Kauai | 13 |
| Apple | Kauai | 12 |
| Pineapple | Maui | 19 |
| Mountain Apple | Hawaii | 23 |
| Sour Sop | Hawaii | 27 |
Enable Horizontal Scroll
Scroll down to the end of Edit Table, check on “Enable horizontal scrolling”.
Screenshot shows the option to enable horizontal scroll
It also can be done by adding a command on custom command.
Set parameter
“scrollX”: true
Screenshot shows command to enable horizontal scroll bar.
Example:
Hawaii Farmers’ Market
| FARMER'S MARKET | Sunday | Monday | Tuesday | Wednesday | Thursday | Friday | Saturday | Time | Location 1 | Location Info | Island | Website | Contact | Phone | |
|---|---|---|---|---|---|---|---|---|---|---|---|---|---|---|---|
| Ala Moana Farmers' Market | X | 9:00 AM to 1:00 PM | 1450 Ala Moana Blvd. Honolulu, HI (21.28928015800045, -157.84219969299974) | Ala Moana Center, upper deck by Sears, corner of Piikoi & Ala Moana Blvd. | Oahu | http://alamoanafarmersmarket.com/ala-moana.html | 808-388-9696 | [email protected] |
Enable vertical scrolling
Enable vertical scrolling. Vertical scrolling will constrain the DataTable to the given height, and enable scrolling for any data which overflows the current viewport. This can be used as an alternative to paging to display a lot of data in a small area (although paging and scrolling can both be enabled at the same time if desired).
Scroll down to the end of Edit Table:
Screenshot shows table options.
Set Parameter
“scrollY”: “200px”, “scrollCollapse”: true, “paging”: false
Example:
Public Charging Stations
Screenshot shows commands to enable vertical scroll bar
| Island | Address | Zip Code | Facility | Parking Lot | Station Availability (Hours) |
|---|---|---|---|---|---|
| Island | Street Adress City, Hawaii Zip Code | Zip Code | Facility | Parking Lot | Station Availability (Hours) |
| Hawaii | 72-100 Kaupulehu Dr Kailua-Kona, Hawaii 96740 (19.827445243219415, -155.99167523068476) | 96740 | Hotel | Four Seasons Resort Hualalai | 24/7 |
| Hawaii | 62-100 Kauna’oa Dr Kohala Coast, Hawaii 96743 (20.016599999890275, -155.7242700003601) | 96743 | Hotel | Hapuna Beach Prince Hotel | 24/7 |
| Hawaii | 2450 Kekuanaoa St, Suite 215 Hilo, Hawaii 96720 (19.715577712536007, -155.04482733776695) | 96720 | Airport | Hilo International Airport | 5:00am - 10:00pm |
| Hawaii | 69-425 Waikoloa Beach Dr Waikoloa, Hawaii 96738 (19.92262948680053, -155.88694018715248) | 96738 | Hotel | Hilton Waikaloa | 24/7 |
| Hawaii | 74-5450 Makala Blvd Kailua-Kona, Hawaii 96740 (19.64962554196788, -156.0039729036985) | 96740 | Commercial | Kona Commons Shopping Center | 8:00am-10:00pm |
| Hawaii | 73-200 Kupipi street Kailua-Kona, Hawaii 96740 (19.737290520646336, -156.04045859217698) | 96740 | Airport | Kona International Airport at Keahole | 24/7 |
| Hawaii | 62-100 Mauna Kea Beach Kohala Coast, Hawaii 96743 (20.016599999890275, -155.7242700003601) | 96743 | Hotel | Mauna Kea Beach Resort | 24/7 |
| Hawaii | Keahole International Airport Kailua-Kona, Hawaii 96740 (19.650440000006142, -155.9799599996541) | 96740 | Commercial | National Car Rental Kona Airport | 5:30am-11:30pm |
| Hawaii | 74-5044 Ane Keohokalole Hwy Kailua-Kona, Hawaii 96740 (19.650440000006142, -155.9799599996541) | 96740 | Commercial | West Hawaii Civic Center | 7:45am-4:30pm Close first Fri of month and County observed holidays |
| Kauai | 1571 Poipu Rd. Koloa, Hawaii 96756 (21.87678431070708, -159.44084500965906) | 96756 | Hotel | Grand Hyatt Kauai | 24/7 |
| Kauai | 4369 Rice Street Lihue, Hawaii 96761 (21.974039820623826, -159.36710913251258) | 96761 | Government | Historic County Building | |
| Kauai | 3610 Rice Street Lihue, Hawaii 96766 (21.964755991613174, -159.35414137281424) | 96766 | Hotel | Kauai Marriott Resort & Beach Club | 24/7 |
| Kauai | 4444 Rice Street Lihue, Hawaii 96766 (21.975084024169593, -159.3690108257757) | 96766 | Government | Lihue Civic Center-Piikoi Building | 24/7 |
| Kauai | 2249 Poipu Road Koloa, Hawaii 96720 (21.878627454871527, -159.46001758041845) | 96720 | Hotel | Marriott Waiohai Beach Club | |
| Kauai | 5-4280 Kuhio Highway Princeville, Hawaii 96722 (22.213130749665254, -159.47352637220382) | 96722 | Commercial | Princeville Shopping Center | 24/7 |
| Kauai | 2440 Hoonani Rd. Koloa, Hawaii 96756 (21.876721358165014, -159.46220390785493) | 96756 | Hotel | Sheraton Kauai | 24/7 |
| Kauai | 3838 Wylie Rd Princeville, Hawaii 96722 (22.221943074619873, -159.46853434707594) | 96722 | Hotel | Westin Princeville Resort | 24/7 |
| Maui | 3600 Lower Honoapiilani Road Lahaina, Hawaii 96761 (20.952712939160733, -156.68663532204664) | 96761 | Commercial | 5A Rent A Space Business Services Center | 24/7 |
| Maui | 30 Halawai Dr #C Lahaina, Hawaii 96761 (20.942316776502025, -156.68840698644436) | 96761 | Commercial | Alamo Rent-a-Car Kaanapali | |
| Maui | 905 Mokuea Pl Kahului, Hawaii 96732 (20.89439190556061, -156.44106644872596) | 96732 | Commercial | Alamo/National Kahului Airport | 24/7 |
| Maui | 55 Amala Place Kahului, Hawaii 96732 (20.89518125803988, -156.46060783511692) | 96732 | Commercial | Bio-Beetle ECO Rental Cars | By appointment and for Bio-Beetle customers only. |
| Maui | 200 south High Street Wailuku, Hawaii 96793 (20.885353719166176, -156.5046395229772) | 96793 | County Building | County Building, Wailuku | 24/7 |
| Maui | 1345 Piilani Highway Kihei, Hawaii 96753 (20.754255865531718, -156.44730352109272) | 96753 | Commercial | Elleair Golf Club | During Golfing hours: 6:30 am to 6:00 pm Mon-Sun and Restaurant hours: 8:00am to 10:00 pm. Closed after 10:00 pm. |
| Maui | 40 Hana Hwy Kahului, Hawaii 96732 (20.89194574964091, -156.46278507573356) | 96732 | Commercial | Enterprise Rent A Car | 7:00am-5:00pm |
| Maui | 3900 Wailea Alanui Wailea, Hawaii 96753 (20.679442862484365, -156.4411963343861) | 96753 | Hotel | Four Seasons Maui (Wailea) | 24/7 |
| Maui | 200 Nohea Kai Drive Lahaina, Hawaii 96761 (20.916152072725744, -156.6945616692168) | 96761 | Hotel | Hyatt Regency Maui | 24/7 |
| Maui | 260 Hana Hwy Kahului, Hawaii 96732 (20.888663224233994, -156.45805464185946) | 96732 | Commercial | Jim Falk Motors of Maui | 7:30am-8:00pm |
| Maui | 4405 Honoapiilani Hwy Kahana, Hawaii 96761 (20.97332540007227, -156.67669781362287) | 96761 | Commercial | Kahana Gateway | 24/7 |
| Maui | 1881 S Kihei Rd Kihei, Hawaii 96753 (20.73335030977387, -156.45264072324306) | 96753 | Commercial | Kihei Town Center | 24/7 |
| Maui | 100 Nohea Kai Drive Lahaina, Hawaii 96761 (20.91616449188996, -156.6945403626842) | 96761 | Hotel | Mariott Maui Ocean Club | 24/7 |
| Maui | 3700 Wailea Alanui Dr Wailea, Hawaii 96753 (20.688015538311618, -156.43965069932614) | 96753 | Hotel | Marriot Wailea Beach | 24/7 |
| Maui | 170 Kaahumanu Avenue Kahului, Hawaii 96732 (20.88967945812709, -156.47218299093976) | 96732 | Hotel | Maui Beach Hotel | |
| Maui | 200 Hobron Avenue Kahului, Hawaii 96732 (20.896199542839497, -156.4636484248817) | 96732 | Utility | Maui Electric Company | 24/7 |
| Maui | 220 Mahalani Street Wailuku, Hawaii 96793 (20.884231686320213, -156.48843029126542) | 96793 | Commercial | Maui Memorial Medical Center | 24/7 |
| Maui | 1 Ritz-Carlton Drive Kapalua, Hawaii 96761 (21.00072919963964, -156.6538299170569) | 96761 | Hotel | Ritz Carlton Kapaalua | 24/7 |
| Maui | 2605 Ka’anapali Parkway Lahaina, Hawaii 96761 (20.92039999976032, -156.6749199996581) | 96761 | Hotel | Sheraton Maui | 24/7 |
| Maui | 3700 Wailea Alanui Wailea, Hawaii 96753 (20.688015538311618, -156.43965069932614) | 96753 | Hotel | Wailea Beach Marriott | 24/7 |
| Maui | 101 Pakaula Street Kahului, Hawaii 96732 (20.87761055649389, -156.45662471983286) | 96732 | Commercial | Walmart | 24/7 |
| Maui | 2365 Ka’anapali Parkway Lahaina, Hawaii 96761 (20.92039999976032, -156.6749199996581) | 96761 | Hotel | Westin Kaanapali Resort and Spa | 24/7 |
| Oahu | 1450 Ala Moana Blvd Honolulu, Hawaii 96814 (21.289311188287115, -157.8421921839348) | 96814 | Commercial | Ala Moana Center | Mall hours, 7:00am-9:30pm |
| Oahu | 3055 N. Nimitz Hwy Honolulu, Hawaii 96819 (21.33583311686283, -157.9082114141057) | 96819 | Commercial | Alamo Rent-a-Car, Nimitz | |
| Oahu | 4339 Waialae Ave Honolulu, Hawaii 96816 (21.27824053410643, -157.78427584524786) | 96816 | Commercial | Aloha Island Mart Kahala | 24/7 |
| Oahu | 94-826 Ukee St Waipahu, Hawaii 96797 (21.41153804528932, -157.99960051872316) | 96797 | Commercial | Aloha Island Mart Waipio-Gentry | 24/7 |
| Oahu | Salt Lake Blvd Honolulu, Hawaii 96815 (21.371864453966737, -157.93368920719575) | 96815 | Commercial | Aloha Stadium | 6:00am-12:00am |
| Oahu | 92-1185 Aliinui Drive Kapolei, Hawaii 96707 (21.340239794806394, -158.12284360961843) | 96707 | Hotel | Aulani A Disney Resort and Spa, Ko Olina | 24/7 |
| Oahu | 3253 N. Nimitz Highway Honolulu, Hawaii 96819 (21.33653458804565, -157.9131037259451) | 96819 | Hotel | Best Western Plaza Hotel | 24/7 |
| Oahu | 1525 Bernice St. Honolulu, Hawaii 96817 (21.333122240610425, -157.86936304388902) | 96817 | Commercial | Bishop Museum | Wed-Mon 9:00am-5:00pm |
| Oahu | 220 S. King St Honolulu, Hawaii 96813 (21.30729762887313, -157.86053835333252) | 96813 | Commercial | Central Pacific Plaza | Mon-Fri 7:00am-7:00pm, Sat 7:00am-3:00pm, Sun closed |
| Oahu | 841 Bishop Street Honolulu, Hawaii 96813 (21.307783262768965, -157.86244491603463) | 96813 | Commercial | Davies Pacific Center | |
| Oahu | 330 Royal Hawaiian Avenue Honolulu, Hawaii 96815 (21.28042588663766, -157.82819873315887) | 96815 | Commercial | DFS Waikiki Galleria | 9:00am-11:00pm |
| Oahu | 1956 Ala Moana Blvd Honolulu, Hawaii 96815 (21.285526846034113, -157.83420892244482) | 96815 | Hotel | Double Tree by Hilton Alana Waikiki Hotel | 24/7 |
| Oahu | 201 Beach Walk Street Honolulu, Hawaii 96815 (21.278030000184515, -157.82469000024318) | 96815 | Hotel | Embassy Suites Waikiki | 24/7 |
| Oahu | 3255 Aolele St Honolulu, Hawaii 96818 (21.333395954163393, -157.91460559373402) | 96818 | Commercial | Enterprise Rent A Car Honolulu Airport | 6:00am-11:00pm |
| Oahu | 46-003 Alaloa St. Kaneohe, Hawaii 96744 (21.416506215332234, -157.80532318199687) | 96744 | Commercial | Enterprise Rent-a-Car, Kaneohe | Mon-Fri 8:00am-6:00pm, Sat 9:00am-12:00pm |
| Oahu | 151 Kaiulani St. Honolulu, Hawaii 96815 (21.277323225636565, -157.8247093636852) | 96815 | Commercial | Enterprise Rent-a-Car, Waikiki | 7:00am-8:00pm |
| Oahu | 91-1401 Ft Weaver Rd Honolulu, Hawaii 96706 (21.333769206953146, -158.02317141687146) | 96706 | Commercial | Ewa Town Center | 7:00am-9:00pm |
| Oahu | 575 Cooke Street Honolulu, Hawaii 96813 (21.299662384844396, -157.8573277736879) | 96813 | Commercial | Green Energy Outlet | 8:00am-5:00pm Mon-Fri, 8:00am-1:00pm Sat, or available 24/7 with a Charge Card |
| Oahu | 1801 Kalakaua Ave Honolulu, Hawaii 96815 (21.29030943573963, -157.83557317379913) | 96815 | Commercial | Hawaii Convention Center | |
| Oahu | 100 Holomoana St. Honolulu, Hawaii 96815 (21.286010676439616, -157.84029461445297) | 96815 | Hotel | Hawaii Prince Hotel | 24/7 |
| Oahu | 415 South Beretania St. Honolulu, Hawaii 96813 (21.307522459380436, -157.85646442453978) | 96813 | Government | Hawaii State Capitol | 4:00am. to 6:30pm Mon-Fri, 6:00am to 2:00pm Saturdays |
| Oahu | 2003 Kalia Rd. Honolulu, Hawaii 96814 (21.28477333511022, -157.83574728358352) | 96814 | Hotel | Hilton Hawaiian Village | 24/7 |
| Oahu | 2500 Kuhio Ave Honolulu, Hawaii 96815 (21.275389683273545, -157.82233515352786) | 96815 | Hotel | Hilton Waikiki Prince | 24/7 |
| Oahu | 818 Keeaumoku St. Honolulu, Hawaii 96814 (21.297018378078235, -157.840879173772) | 96814 | Commercial | HMSA Center (Hawaii Medical Service) | Mon-Thurs 7:00am-12:00am, Fri 7:00am-2:00am, Sat 3:00pm-2:00pm, Sun 9:00am-12:00am |
| Oahu | 1288 Ala Moana Blvd Honolulu, Hawaii 96814 (21.29181130352856, -157.84994433982735) | 96814 | Condo | Hokua Condominium | 6:00am-2:00am |
| Oahu | 2300 Kalakaua Ave Honolulu, Hawaii 96815 (21.277871812074466, -157.8275152484166) | 96815 | Hotel | Holiday Inn Beachcomber | 24/7 |
| Oahu | 300 Rodgers Boulevard Honolulu, Hawaii 96819 (21.335604930654792, -157.91871398519555) | 96819 | Airport | Honolulu International Airport | 24/7 |
| Oahu | 563 Kamoku Street Honolulu, Hawaii 96826 (21.286347176348407, -157.82475281350472) | 96826 | School | Iolani School | 9:00am-3:00pm the lot is reserved for school staff, after 3:00pm the lot is open to those attending special events at Iolani |
| Oahu | 564 Pohukaina Honolulu, Hawaii 96813 (21.301576014347276, -157.86136064277085) | 96813 | Government | Ka`ahumanu Hale parking Garage First Circuit Court | 7:00am-5:00pm |
| Oahu | 4211 Waialae Ave Honolulu, Hawaii 96816 (21.278465364613794, -157.78658710286317) | 96816 | Commercial | Kahala Mall | Mon-Fri 8:00am-5:00pm, Sat 8:00am-12:00pm |
| Oahu | 434 Kuulei Rd Kailua, Hawaii 96734 (21.3947297165617, -157.7432487742712) | 96734 | Commercial | Kailua Shell | 24/7 |
| Oahu | 3221 Waialae Ave Honolulu, Hawaii 96816 (21.287044896773295, -157.80755929258643) | 96816 | Commercial | Kaimuki Shopping Center | Mon-Fri 8:30am-5:00pm |
| Oahu | 2828 Paa Street Honolulu, Hawaii 96819 (21.345051167663144, -157.89474856332708) | 96819 | Commercial | Kaiser Permanente Mapunapuna | 8:00am-5:00pm |
| Oahu | 3288 Moanalua Road Honolulu, Hawaii 96819 (21.362489021811257, -157.90030637346817) | 96819 | Commercial | Kaiser Permanente Moanalua Medical Center | 24/7 |
| Oahu | 94-1480 Moaniani St. Waipahu, Hawaii 96797 (21.425325812664497, -157.99796942170946) | 96797 | Commercial | Kaiser Permanente Waipio | 24/7 |
| Oahu | 160 Ahui Street Honolulu, Hawaii 96813 (21.293461524831603, -157.86003755519) | 96813 | Commercial | Kakaako Piano Lot Parking Facility | 24/7 |
| Oahu | 4450 Kapolei Parkway Kapolei, Hawaii 96707 (21.328854377915434, -158.0914212979147) | 96707 | Commercial | Kapolei Commons | 7:00am-9:00pm |
| Oahu | 4675 Kapolei Pkwy Kapolei, Hawaii 96707 (21.327829461113208, -158.08683820776824) | 96707 | Government | Kapolei Judiciary State Ownership | 7:00am-5:00pm |
| Oahu | 590 Farrington Hwy Kapolei, Hawaii 96707 (21.33845913718835, -158.0784440810319) | 96707 | Commercial | Kapolei Shopping Center | 8:00am-10:00pm |
| Oahu | 600 Queen St Honolulu, Hawaii 96813 (21.302297398390238, -157.8581101838534) | 96813 | Condo | Keola Lai Condominium | 24/7 |
| Oahu | 45-568 Kamehameha Hwy Kaneohe, Hawaii 96744 (21.399453085430384, -157.79902564501552) | 96744 | Commercial | King Windward Nissan | 7:00am-8:00pm, by appreservation |
| Oahu | 55-510 Kamehameha Hwy Laie, Hawaii 96762 (21.647158676827154, -157.92152970923166) | 96762 | Commercial | Laie Village Center | 8:00am-7:00pm |
| Oahu | 609 Kailua Road Kailua, Hawaii 96734 (21.394001265717975, -157.74199871665047) | 96734 | Commercial | Longs Drugs | 8:00am-9:00pm |
| Oahu | 22 S. Pauahi St. Honolulu, Hawaii 96813 (21.311183536789333, -157.86094481970065) | 96813 | Commercial | Mark’s Garage | Mon 5:45am-10:00pm, Tue 10:45am-12:00am, Wed-Fri 5:45am-2:00am, Sat 7:00am-2:00am |
| Oahu | 2552 Kalakaua Avenue Honolulu, Hawaii 96815 (21.272511852779814, -157.82323447555714) | 96815 | Hotel | Marriot Waikiki Beach | 24/7 |
| Oahu | 930 Valkenburgh St Pearl City, Hawaii 96818 (21.343776924855927, -157.92813395368722) | 96818 | Commercial | Moanalua Shopping Center | 7:00am-9:00pm |
| Oahu | 2295 North King Street Honolulu, Hawaii 96819 (21.33549137449171, -157.8816364481399) | 96819 | Commercial | New City Nissan | 6:30am-8:00pm |
| Oahu | 1130 North Nimitz Hwy Honolulu, Hawaii 96817 (21.319174147958822, -157.87623425225317) | 96817 | Commercial | Nimitz Center | 8:00am-9:00pm |
| Oahu | 3401 N. Nimitz Hwy, Honolulu, Hawaii 96815 (21.33722706600821, -157.9174564445669) | 96815 | Hotel | Ohana Honolulu Airport | 24/7 |
| Oahu | 150 Kaiulani Avenue Honolulu, Hawaii 96815 (21.277494096822124, -157.82488922809105) | 96815 | Hotel | Ohana Waikiki East | 24/7 |
| Oahu | 2211 Kuhio Avenue Honolulu, Hawaii 96815 (21.280911520533493, -157.8279019568892) | 96815 | Hotel | Ohana Waikiki Malia | 24/7 |
| Oahu | 2330 Kuhio Avenue Honolulu, Hawaii 96815 (21.278564290037025, -157.82506909249693) | 96815 | Hotel | Ohana Waikiki West | 24/7 |
| Oahu | 2169 Kalia Road Honolulu, Hawaii 96815 (21.278906032408145, -157.83238957381542) | 96815 | Hotel | Outrigger Reef | 24/7 |
| Oahu | 2335 Kalakaua Avenue Honolulu, Hawaii 96815 (21.27763798834684, -157.82731739757017) | 96815 | Hotel | Outrigger Waikiki | 24/7 |
| Oahu | 98-1005 Moanalua Rd (downtown) Aiea, Hawaii (21.385934347115153, -157.94082083088813) | Commercial | Pearlridge Shopping Center (downtown) | Mon-Sat 10:00am-9:00pm, Sun 10:00am-6:00pm | |
| Oahu | 98-1005 Moanalua Rd (uptown) Aiea, Hawaii (21.385934347115153, -157.94082083088813) | Commercial | Pearlridge Shopping Center (uptown) | Mon-Sat 10:00am-9:00pm, Sun 10:00am-6:00pm | |
| Oahu | 55-370 Kamehameha Hwy Laie, Hawaii 96762 (21.638913194296748, -157.91929194484317) | 96762 | Commercial | Polynesian Cultural Center | 11:00am-10:00pm |
| Oahu | 1380 Lusitania street Honolulu, Hawaii 96813 (21.308592652595337, -157.85289411608346) | 96813 | Commercial | Queen’s Physician Office Building | 24/7 |
| Oahu | 2255 Kalakaua Ave Honolulu, Hawaii 96815 (21.278717174782003, -157.82857644841118) | 96815 | Hotel | Sheraton Waikiki | 24/7 |
| Oahu | 4561 Salt Lake Blvd Honolulu, Hawaii 96818 (21.365303899762978, -157.92906669196518) | 96818 | Commercial | Stadium Marketplace | 7:00am-9:00pm |
| Oahu | 1600 Kapiolani Boulevard Honolulu, Hawaii 96814 (21.29189224251121, -157.83970106191362) | 96814 | Commercial | The Pan Am Building | Mon-Fri 6:00am-10:00pm, Sat 7:00am-5:00pm, Sun closed |
| Oahu | 94-1299 Ka Uka Blvd Honolulu, Hawaii 96797 (21.428364360457522, -157.99888106109972) | 96797 | Commercial | Tony Nissan | 7:00am to 8:00pm |
| Oahu | 700 Bishop St. Honolulu, Hawaii 96813 (21.3072256831108, -157.86340719060598) | 96813 | Commercial | TOPA Financial Center | 5:00am-8:00pm |
| Oahu | 95-1249 Meheula Pkwy Mililani, Hawaii 96789 (21.453248200399102, -158.00784762085445) | 96789 | Commercial | Town Center of Mililani | 7:00am-10:00pm |
| Oahu | 57-091 Kamehameha Hwy Kahuku, Hawaii 96731 (21.6976574741794, -157.99224422954634) | 96731 | Hotel | Turtle Bay Resort | 24/7 |
| Oahu | 3029 Lowrey Avenue Honolulu, Hawaii 96822 (21.308133998360404, -157.8065790315745) | 96822 | Government | Univ of Hawaii Faculty Housing | 24/7 |
| Oahu | 2500 Campus Rd – Arena Parking Honolulu, Hawaii 95822 (38.51372000007808, -121.49462000001284) | 95822 | School | Univ of Hawaii Lower Campus Parking Garage | 5:00am-12:00am UH Permit Holders Access: 24/7 |
| Oahu | 1226 College Walk Honolulu, Hawaii 96817 (21.315085757646898, -157.86148264146328) | 96817 | Commercial | USA Hawaii Credit Union | Mon-Fri 7:00am-7:00pm, Sat 7:00am-2:30pm |
| Oahu | 94-849 Lumiaina Street Waipahu, Hawaii 96797 (21.399988788222664, -158.00521770573695) | 96797 | Commercial | Waikele Center | 24/7 |
| Oahu | 2552 Kalakaua Avenue Honolulu, Hawaii 96815 (21.272511852779814, -157.82323447555714) | 96815 | Hotel | Waikiki Beach Marriott | 24/7 |
| Oahu | 2233 Helumoa Rd Honolulu, Hawaii 96815 (21.278276506987652, -157.83050099755388) | 96815 | Hotel | Waikiki Parc Hotel & Halekulani Hotel | 24/7 |
| Oahu | 2375 Ala Wai Blvd Honolulu, Hawaii 96815 (21.279148849356034, -157.82297367216864) | 96815 | Hotel | Waikiki Sand Villa | 24/7 |
| Oahu | 2255 Kuhio Avenue Honolulu, Hawaii 96815 (21.280111123927384, -157.82698464841934) | 96815 | Commercial | Waikiki Trade Center | 24/7 |
| Oahu | 500 Ala Moana Blvd. Honolulu, Hawaii 96813 (21.30097539500713, -157.8631373939972) | 96813 | Commercial | Water Front Plaza | 24/7 |
| Oahu | 1199 Auloa Road Kailua, Hawaii 96734 (21.374324099716887, -157.77992312662604) | 96734 | Commercial | Whole Foods Kailua | 7:00am-10:00pm |
| Oahu | 227 Lewers Street Honolulu, Hawaii 96815 (21.279037461318318, -157.83102218381737) | 96815 | Hotel | Wyndham Hotel | 24/7 |
Set Column Widths
Column widths can be done with the following CSS code, which can be added to the “Custom CSS” textarea in the “Plugin Options” (TablePress > Plugin Options):
”
.tablepress-id-N .column-2 {
	width: 30%;
}
”
The N needs to be changed to the ID of the table in question (or use.tablepress as the first part of the selector, if you want this to apply to all tables).
Column Filters
TablePress Extension: DataTables ColumnFilterWidgets required.
Ex. [table id=2 datatables_columnfilterwidgets=true datatables_columnfilterwidgets_exclude_columns=1,2,3,4 /]